Updating a Project field from Workflow, SharePoint Designer 2013

With Project Server 2013, the ability to easily create workflows with SharePoint Designer 2013 was introduced. This is/was great news for power users and non-developers, and it's long overdue. Even for someone who can code (like me), I love this idea because 1) it gives me the ability to easily create a pretty robust workflow without opening Visual Studio, and 2) I can create workflows straight away for Project Online without needing my own on-prem environment (even though I do actually have one). Notice that I say "pretty robust." There are instances when you're creating a workflow that will require you to break out Visual Studio to do what you need to (or hire a developer), but a large part of workflows can be done within SharePoint Designer 2013 (SPD 2013). One of the many features within SPD 2013 is the ability to have your workflow update an Enterprise Project Field directly. This is an awesome feature, but it needs some work, so let me expand on that. When a user edits an Enterprise Project Field from within PWA (Project Web App) and clicks save, what's known as a "light publish" happens. If you recall, updating a project schedule will update the draft tables (formerly its own database) and a user then needs to publish those changes--appropriately known as the publish tables--so they can be seen by everyone from within PWA. When you use the Set Project Field action within a workflow, the value is essentially stored in the draft tables. What this means is that if a user simply looks at the project from within PWA, the value doesn't look like it has been changed. Also, any views that might be keyed on this new value don't show it either. But if you edit the project, the new value shows up. Click save, and all of a sudden the value is viewable. It would be nice if this action would automatically "light publish" this change, or better yet, stuff the value in both the draft and publish tables at once. Even better still, it would be great to have an option that the workflow author can set to turn on or off the light publish feature; that way the author can decide if he or she is ready to initiate the light publish. It doesn't do any of that now, and that is a problem. Fortunately, there are REST calls you can make from within the workflow to do this, but they can be hard to understand and construct. I can sort of see the reasoning behind not having the light publish option as part of the action, since you may want to set several project fields before initiating this light publish. Not having this built in is kind of a pain, though, and not really user friendly to those non-developer types who are probably using SPD2013 to begin with.

Essentially then, after setting any project fields with this action, you will need to use the Call HTTP Web Service action in order to 1) check out the project, and 2) initiate a publish. Unfortunately, this is a full publish and not just a light publish, so if there are changes to the project schedule, those are going to be published as well. Okay, here's how to do this.

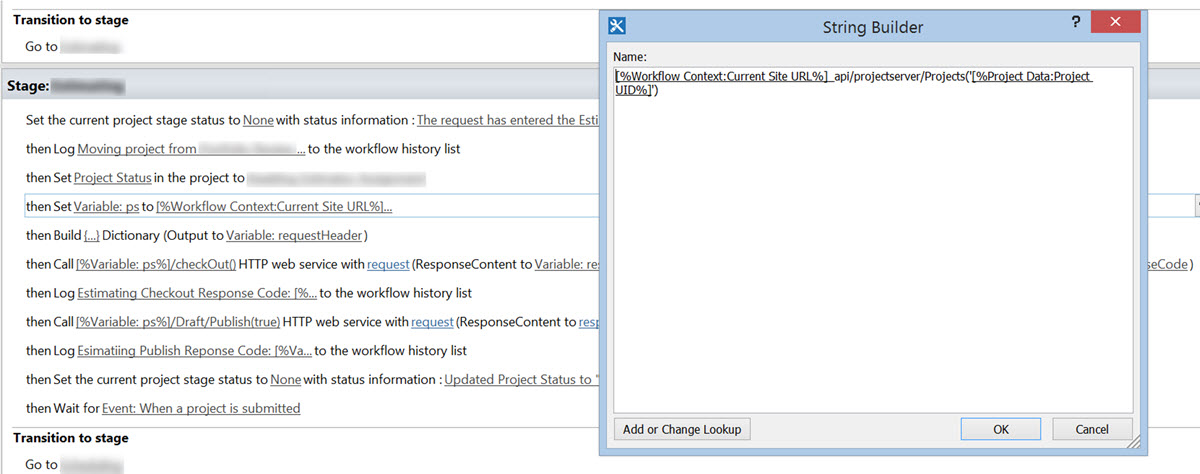
First, I like to create a variable to hold my instance reference so I can reuse it throughout my workflow. Believe me, you'll want to do this. You can call it anything. I've picked up the habit of calling it "ps" for "Project Server" from the talented, helpful, and ever-patient Biatrice "Bia" Ambrosa from the MS Project product team. It just makes sense, and I like easy. Notice that I am using an instance reference (specifically using a project variable reference) and not hard coding those values into the workflow. You can access these by clicking on the "Add or Change Lookup" button in the lower left.

workflow1

Next, you'll want to create a variable to hold your HTTP Web Service call headers as well. Yes, you will be reusing these too. It is actually a dictionary, and not just a simple one-value variable, so use the Build Dictionary action.

workflow_requestHeaders

workflow_requestHeaders2

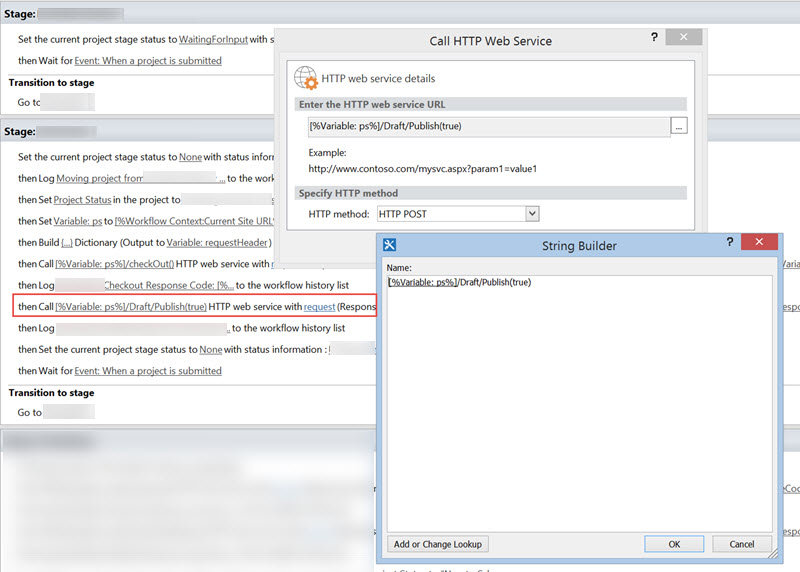
Now you are ready to construct your first HTTP Web Service call using both the Project Server instance variable ("ps") and the "requestHeaders" (or whatever you named it) from above. Most HTTP Web Service requests that you do within a workflow are "GET" calls, meaning you are going out and getting information, like when you are reading in OData. These are POST calls, meaning they update or are sending information to the service you are calling, so be sure to change the HTTP method to POST.

workflow_checkout

You should do some sort of error checking after this step to make sure you were actually able to check out the project before continuing.

Last, construct the HTTP Web Service Call to call the Publish() REST method. Because you've already done most of the work, you have most of the call already constructed. Using the "ps" variable and the "requestHeaders" dictionary, add the Publish() call.

workflow_publish

Now save and publish your workflow, and the Enterprise Project Field value will be updated. If your workflow is like mine, I actually had to set this field throughout the whole workflow as it progressed from stage to stage. I was able to reuse those "ps" and "requestHeader" values throughout.

The REST calls are documented in the Project 2013 SDK that you can download here.  Also check out Bia's Project Conference 2014 Workflow Deep Dive session here. I highly recommend it.

Footnote: The ability to update multiple fields at once has just been added, but you still need to publish in order for those changes be seen within PWA.

Windows Azure: Perfect for hosting a Project Server 2013 Demo/Dev environment

Don't get me wrong. Project Online is great. It's easy to create an instance. It works (generally speaking) just like a Project Server 2013 environment and as a non-infrastructure type person, I don't have to worry about having a server machine sitting  under my desk making noise, chewing up my electric bill waiting to be hacked by some teenager (or govt agency) on the other side of the world. On the other hand, there are just some situations where having your own "on premise", honest to goodness instance of Project Server is needed. Doing OLAP reporting? Not possible with Project Online. Writing apps to consume Project data? Very hard to do (and currently in flux) with Project Online. But if you are Active Directory and Security challenged like I am, what are you to do? Mostly, I have been leaning on my friends who are gurus in that kind of stuff to help me out. But I have some credits on Windows Azure that I've been wanting to use and thought this would be a great opportunity. Depending on your MSDN subscription and other programs you might have access to the amount of credit you have to play with will vary between $50-150 per month. Also, if you don't have an MSDN subscription or Azure credit from another program (like the Microsoft Partner Program, BizSpark or something else), then you can actually purchase what you need.

AzureWindows Azure is a lot of things. It's a server farm. It's a data farm. It's a media hosting service. It's a web hosting service. It is a basically a dynamically expanding and contracting computing resource mega house with data centers around the world, all hosted in the dubious buzzword of "the cloud". If you don't have an Azure account, you'll need to sign up for one. Go to http://azure.microsoft.com to do so. Warning: Using this isn't free. That's the trade off. In exchange for money (or credits), someone else worries about patches and server maintenance and security. It probably is cheaper to get a server machine and stick it under my desk, a one time expense (not considering electricity and hardware upgrades), but then I'd have to worry about getting hacked and up time and maintenance and... BLECH!

Now I'm not a complete clueless newbie when it comes to installing operating systems, servers and such. There was a point in my career, long, long ago, when I did maintain desktops, servers and such for the company I worked for. I also used to be a field systems engineer for a software company I worked for and we went out to troubleshoot installation issues with customers. I discovered quite quickly though that I didn't want to do that. It wasn't my THANG. I wasn't passionate about it. So I went back to software dev and to implementing and teaching business solutions software. But the remnants of those days do still linger in the back recesses of my brain.

Luckily for me (and for you too) I don't have to rely on my sketchy knowledge of doing this. First off, the Azure team has created a gallery of already built machines with commonly used profile for you to choose from. Need a server running Windows Server 2012 R2? They have that. SQL Server 2012 SP1? Yep. Even want to test on just released (RTM) environments like SQL Server 2014 RTM? They have that too. There is even an already built server with SharePoint 2013 already installed! Additionally, there are a lot of great blogs about how to actually create whole server farms on the Azure platform. Specifically, I recommend using Keith Mayer's Step by Step instructions for creating a SharePoint 2013 farm. It is fantastic. Basically, you will be setting up three (3) servers; a Domain Controller, a SQL Server server, and a SharePoint/Project Server server/web front end.

This will only get you about 85% there on your Project Server farm. You'll need to install Project Server on the SharePoint server you create. If you've never done that, it is actually easier than it used to be given that Project Server is now an application service on SharePoint. There are some great MSDN articles and videos available. (Take a look here: http://technet.microsoft.com/en-us/library/ee662109(v=office.15).aspx). You'll need to download the Project Server 2013 software bits first. Whether you do this from your MSDN account, use a trial version of it or use an existing licensed copy is up to you. Normally, you would download the iso or .exe to your own computer, then upload it to the server you are installing it on. DON'T. Download it directly to your SharePoint Server Virtual Machine on Azure. Why? Because the Azure platform as a wickedly fast connection to MSDN. It will take you only a fraction of the time to download it.

After all of that, you have a Project Server 2013 farm running. You can create projects on it, enter risks, issues, create enterprise custom fields, resources and everything you normally would on a true on premise server farm. Have caution though. You will be charged for every millisecond that these servers are running. So here's what I do: I turn them off when I'm not using them. Basically I start with the SharePoint/Project Server and turn that off. Then I turn off my SQL Server server and then lastly I turn off the Domain Controller. When I want to use them again, for a client or debugging an app I'm writing, I turn them all back on, in the reverse order that I turned them off (DC, SQL SERVER, SP/PS). Be sure to wait until one is done cycling up before turning the next on.

And that's it.

Are you talking to your computer screen right now, telling me that demo images of Project Server 2013 already exists and that I could use those? If you are, then you are correct. And I could load those up on the beefed up desktop or laptop computer if I wanted. Realistically though that would require me to carry or have a machine with 32 gigs of RAM and at least a 1-2 TB hard drive in it. That sounds suspiciously like specs for a server machine. Also, that is WAAAY more hardware than I personally want to lug through airport security or to a client site. Some do (including some of those friends I told you I was leaning on for help) and that is a personal choice. The Azure platform is just another option for you to consider. And hopefully this post will help you on your way.