Updating a Project field from Workflow, SharePoint Designer 2013
/With Project Server 2013, the ability to easily create workflows with SharePoint Designer 2013 was introduced. This is/was great news for power users and non-developers, and it's long overdue. Even for someone who can code (like me), I love this idea because 1) it gives me the ability to easily create a pretty robust workflow without opening Visual Studio, and 2) I can create workflows straight away for Project Online without needing my own on-prem environment (even though I do actually have one). Notice that I say "pretty robust." There are instances when you're creating a workflow that will require you to break out Visual Studio to do what you need to (or hire a developer), but a large part of workflows can be done within SharePoint Designer 2013 (SPD 2013). One of the many features within SPD 2013 is the ability to have your workflow update an Enterprise Project Field directly. This is an awesome feature, but it needs some work, so let me expand on that. When a user edits an Enterprise Project Field from within PWA (Project Web App) and clicks save, what's known as a "light publish" happens. If you recall, updating a project schedule will update the draft tables (formerly its own database) and a user then needs to publish those changes--appropriately known as the publish tables--so they can be seen by everyone from within PWA. When you use the Set Project Field action within a workflow, the value is essentially stored in the draft tables. What this means is that if a user simply looks at the project from within PWA, the value doesn't look like it has been changed. Also, any views that might be keyed on this new value don't show it either. But if you edit the project, the new value shows up. Click save, and all of a sudden the value is viewable. It would be nice if this action would automatically "light publish" this change, or better yet, stuff the value in both the draft and publish tables at once. Even better still, it would be great to have an option that the workflow author can set to turn on or off the light publish feature; that way the author can decide if he or she is ready to initiate the light publish. It doesn't do any of that now, and that is a problem. Fortunately, there are REST calls you can make from within the workflow to do this, but they can be hard to understand and construct. I can sort of see the reasoning behind not having the light publish option as part of the action, since you may want to set several project fields before initiating this light publish. Not having this built in is kind of a pain, though, and not really user friendly to those non-developer types who are probably using SPD2013 to begin with.
Essentially then, after setting any project fields with this action, you will need to use the Call HTTP Web Service action in order to 1) check out the project, and 2) initiate a publish. Unfortunately, this is a full publish and not just a light publish, so if there are changes to the project schedule, those are going to be published as well. Okay, here's how to do this.
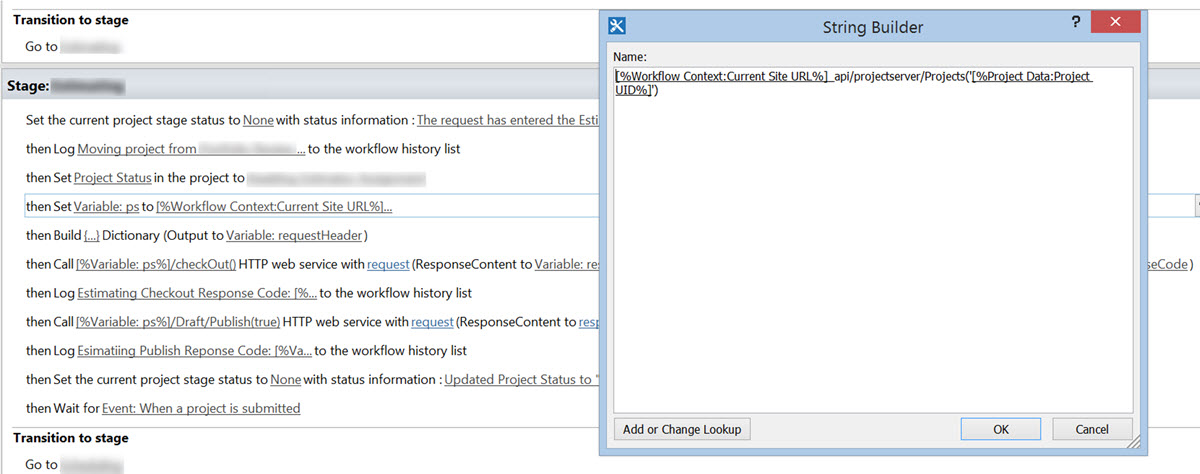
First, I like to create a variable to hold my instance reference so I can reuse it throughout my workflow. Believe me, you'll want to do this. You can call it anything. I've picked up the habit of calling it "ps" for "Project Server" from the talented, helpful, and ever-patient Biatrice "Bia" Ambrosa from the MS Project product team. It just makes sense, and I like easy. Notice that I am using an instance reference (specifically using a project variable reference) and not hard coding those values into the workflow. You can access these by clicking on the "Add or Change Lookup" button in the lower left.
Next, you'll want to create a variable to hold your HTTP Web Service call headers as well. Yes, you will be reusing these too. It is actually a dictionary, and not just a simple one-value variable, so use the Build Dictionary action.
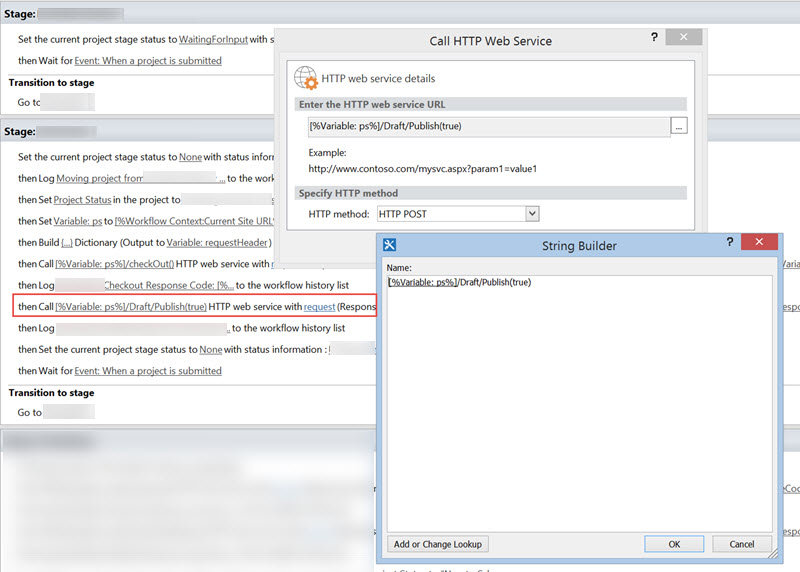
Now you are ready to construct your first HTTP Web Service call using both the Project Server instance variable ("ps") and the "requestHeaders" (or whatever you named it) from above. Most HTTP Web Service requests that you do within a workflow are "GET" calls, meaning you are going out and getting information, like when you are reading in OData. These are POST calls, meaning they update or are sending information to the service you are calling, so be sure to change the HTTP method to POST.
You should do some sort of error checking after this step to make sure you were actually able to check out the project before continuing.
Last, construct the HTTP Web Service Call to call the Publish() REST method. Because you've already done most of the work, you have most of the call already constructed. Using the "ps" variable and the "requestHeaders" dictionary, add the Publish() call.
Now save and publish your workflow, and the Enterprise Project Field value will be updated. If your workflow is like mine, I actually had to set this field throughout the whole workflow as it progressed from stage to stage. I was able to reuse those "ps" and "requestHeader" values throughout.
The REST calls are documented in the Project 2013 SDK that you can download here. Also check out Bia's Project Conference 2014 Workflow Deep Dive session here. I highly recommend it.
Footnote: The ability to update multiple fields at once has just been added, but you still need to publish in order for those changes be seen within PWA.


